
How to Change Oil Yourself: Easy DIY Maintenance Guide

How to change oil is one of the easiest car maintenance skills anyone can learn. You do not need to be a professional mechanic. With a few simple tools, the right engine oil, and a little time, you can change your car’s oil at home. This simple task helps your engine run smoothly, improves fuel efficiency, and extends the life of your vehicle.
Moreover, changing your own oil saves money because you avoid paying labor charges at a repair shop. It also helps you understand your car better. Even if this is your first time, this guide will explain every step using simple language.
In this complete guide, you will learn how to change oil safely, choose the correct oil, replace the oil filter, avoid common mistakes, and keep your engine in excellent condition.
Table of Contents
What Does Engine Oil Do?
Engine oil is the lifeblood of your car. It keeps every moving engine part working smoothly.
Without clean oil, metal parts rub together. As a result, they create heat and wear out much faster.
Engine oil performs several important jobs.
- Lubricates moving parts
- Reduces friction
- Removes dirt
- Prevents rust
- Helps cool the engine
- Protects engine parts from damage
Therefore, regular oil changes are one of the best ways to keep your vehicle healthy.
According to the American Automobile Association (AAA) and most vehicle manufacturers, clean oil helps engines last much longer.
Learn more:
Why Learning How to Change Oil Matters
Many drivers pay a mechanic every few months. However, learning how to change oil yourself gives you many advantages.
First, you save money.
Second, you know exactly which oil goes into your engine.
Third, you can inspect your car while working underneath it.
Finally, you gain confidence in maintaining your vehicle.
Many first-time DIY mechanics discover that an oil change is much easier than they expected.
Benefits of Changing Your Own Oil
There are many good reasons to perform your own maintenance.
You Save Money
Professional oil changes often cost between $40 and $120.
However, doing it yourself usually costs much less.
You Learn About Your Car
Every oil change teaches you something new.
For example, you learn where important parts are located.
Eventually, simple maintenance becomes easier.
You Choose Better Oil
Some repair shops use lower-cost oils.
Instead, you can choose premium synthetic oil if you change it yourself.
You Protect Your Engine
Fresh oil reduces engine wear.
Consequently, your engine may last for hundreds of thousands of miles.
You Feel More Confident
Completing your own maintenance builds useful skills.
Many people begin with an oil change before learning other repairs.
Signs Your Oil Needs Changing
Your vehicle often gives warning signs.
Do not ignore them.
Instead, check your oil immediately if you notice these problems.
Dark Oil
Fresh oil looks amber.
Old oil becomes dark and dirty.
Engine Noise
Clean oil cushions moving parts.
Old oil loses that protection.
As a result, your engine may sound louder.
Oil Warning Light
If your dashboard oil light appears, check the oil level as soon as possible.
Never continue driving without enough oil.
Burning Smell
Burning oil smells unusual.
Therefore, inspect your engine immediately.
Poor Fuel Economy
Dirty oil increases friction.
Consequently, your engine works harder.
That means you may use more fuel.
Rough Engine Performance
If the engine feels sluggish, old oil may be one cause.
However, other issues can also affect performance.
How Often Should You Change Oil?
Many people still believe every 3,000 miles.
However, modern engines often last much longer between oil changes.
Typical recommendations include:
| Oil Type | Recommended Interval |
| Conventional Oil | 3,000–5,000 miles |
| Synthetic Blend | 5,000–7,500 miles |
| Full Synthetic | 7,500–10,000 miles |
| Heavy-Duty Driving | More frequent changes |
Always check your owner’s manual first.
Every manufacturer provides the correct schedule.
Understanding Different Types of Engine Oil
Choosing the right oil matters.
Let’s look at the main types.
Conventional Oil
This is the most basic engine oil.
It costs less.
However, it usually requires more frequent changes.
Synthetic Blend
Synthetic blend combines conventional and synthetic oils.
Therefore, it offers better protection without costing as much.
Full Synthetic Oil
Full synthetic provides excellent protection.
It performs well in hot and cold temperatures.
Most newer vehicles recommend it.
High Mileage Oil
High mileage oil works well for vehicles with over 75,000 miles.
It contains additives that help older engines.
Choosing the Correct Oil for Your Vehicle
One of the biggest mistakes beginners make is choosing the wrong oil.
Instead, follow these simple steps.
Read Your Owner’s Manual
This is always your best source.
It lists:
- Oil viscosity
- Oil capacity
- Recommended oil type
Check the Oil Cap
Many vehicles print the recommended viscosity directly on the oil cap.
For example:
- 0W-20
- 5W-20
- 5W-30
Consider Your Climate
Cold weather often requires thinner oil.
Hot weather may require thicker oil.
However, always follow the manufacturer’s recommendation.
Understanding Oil Viscosity
You may wonder what numbers like 5W-30 mean.
They describe how thick the oil is.
Example:
5W-30
- 5W means winter performance.
- 30 means oil thickness when the engine is hot.
Lower numbers flow better during cold starts.
Therefore, choosing the correct viscosity protects your engine.
Tools Needed for How to Change Oil
Before starting, gather everything.
This makes the job easier.
Here is a basic checklist.
| Tool | Purpose |
| Engine oil | New oil |
| Oil filter | Replacement filter |
| Oil filter wrench | Remove filter |
| Socket wrench | Remove drain plug |
| Oil drain pan | Catch used oil |
| Funnel | Pour new oil |
| Gloves | Keep hands clean |
| Safety glasses | Protect eyes |
| Shop towels | Clean spills |
| Jack | Lift vehicle |
| Jack stands | Support vehicle safely |
| Wheel chocks | Prevent rolling |
Having all tools nearby saves time.
Safety Tips Before You Begin
Safety should always come first.
Even a simple oil change requires careful preparation.
Park on Level Ground
A flat surface keeps your vehicle stable.
Never work on a hill.
Let the Engine Cool Slightly
Warm oil drains faster.
However, extremely hot oil can burn your skin.
Wait about 15–20 minutes after driving.
Wear Gloves
Oil stains your hands.
Disposable gloves make cleanup easier.
Wear Safety Glasses
Oil can splash unexpectedly.
Eye protection is always a good idea.
Use Jack Stands
Never rely only on a hydraulic jack.
Always support your vehicle with jack stands.
This step can prevent serious injuries.
Prepare Your Vehicle
Preparation makes every step smoother.
Follow these simple steps.
- Park on level ground.
- Turn off the engine.
- Apply the parking brake.
- Gather your tools.
- Put on gloves.
- Position your drain pan nearby.
Now you’re ready to begin.
Warm Up the Engine
Many beginners ask whether the engine should be warm.
The answer is yes—but only slightly.
Warm oil flows much better.
As a result, it carries away more dirt and contaminants.
Drive your car for about five minutes.
Then turn it off.
Wait another fifteen minutes.
Now the oil is warm without being dangerously hot.
Lift Your Vehicle Safely
Some vehicles have enough ground clearance.
Others require lifting.
If needed:
- Place wheel chocks behind the rear wheels.
- Position your jack correctly.
- Raise the vehicle slowly.
- Install jack stands.
- Lower the vehicle onto the stands.
Finally, gently shake the car.
It should feel completely stable before you go underneath.
Locate the Oil Drain Plug
Every engine has an oil pan underneath.
The drain plug sits at the bottom.
It usually looks like a large bolt.
Before removing anything, make sure you identify:
- Oil drain plug
- Oil filter
- Oil pan
Never confuse the transmission drain plug with the engine oil drain plug.
If you are unsure, check your owner’s manual.
Prepare for the Oil Change
Before loosening the drain plug, complete one final check.
Ask yourself:
- Is the drain pan directly underneath?
- Do I have the correct wrench?
- Is the engine warm but not too hot?
- Am I wearing gloves?
- Is the vehicle safely supported?
If everything looks good, you are ready to start draining the old oil.
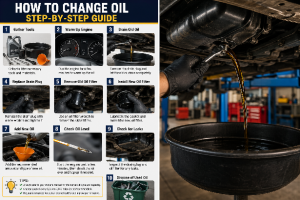
How to Change Oil Step by Step
Many people feel nervous before their first oil change. However, once you complete it, you will realize it is much easier than expected.
Let’s begin.
Step 1 – Position the Drain Pan Correctly
Slide the oil drain pan directly under the drain plug.
Next, leave a little extra space because the oil may shoot out at an angle when you remove the plug.
A larger drain pan helps prevent spills.
Tip: Use a pan that holds at least 10 quarts of oil.
Step 2 – Remove the Drain Plug
Use the correct socket wrench.
Turn the drain plug counterclockwise.
When it becomes loose, finish removing it by hand.
Be careful because the oil may still feel warm.
Once the plug comes out, allow the oil to flow freely into the drain pan.
This step usually takes five to fifteen minutes.
Step 3 – Let Every Drop Drain Out
Many beginners rush this step.
Instead, wait patiently.
The longer the old oil drains, the cleaner your engine becomes.
While waiting, inspect the drain plug.
Look for:
- Damaged threads
- Cracks
- Rust
- Metal particles
Tiny metal flakes may be normal.
However, large metal pieces could mean serious engine wear.
Step 4 – Replace the Drain Plug Washer
Many drain plugs include a crush washer.
This washer seals the oil pan.
After several oil changes, it may no longer seal properly.
Therefore, replace it whenever recommended.
A fresh washer helps prevent leaks.
Step 5 – Reinstall the Drain Plug
Thread the drain plug by hand first.
This helps avoid cross-threading.
Next, tighten it with a wrench.
Do not overtighten it.
Too much force can damage the oil pan.
Always follow your owner’s manual for the correct torque specification.
How to Change Oil by Replacing the Oil Filter
The oil filter traps dirt, dust, and tiny metal particles.
Over time, it fills with contaminants.
Because of this, replacing the filter during every oil change is a smart habit.
Locate the Oil Filter
Oil filters sit in different places depending on the vehicle.
Common locations include:
- Near the engine block
- Under the engine
- Beside the exhaust manifold
- On top of the engine in some newer vehicles
If needed, check your owner’s manual.
Remove the Old Oil Filter
Use an oil filter wrench.
Turn the filter counterclockwise.
Some oil will spill out.
Therefore, keep your drain pan underneath.
After removing the filter, check that the old rubber gasket came off with it.
Sometimes the gasket sticks to the engine.
Never install a new filter over an old gasket.
Doing so can cause serious leaks.
Prepare the New Oil Filter
Before installing the new filter:
- Compare it with the old filter.
- Make sure the size matches.
- Lightly coat the rubber gasket with fresh engine oil.
This simple step creates a better seal.
Additionally, it makes the next oil change much easier.
Install the New Oil Filter
Thread the filter by hand.
Turn it until the gasket touches the engine.
Then tighten it another three-quarters of a turn.
Most manufacturers recommend hand tightening only.
Avoid using a wrench unless your owner’s manual says otherwise.
How to Change Oil by Adding Fresh Engine Oil
Now your engine is ready for fresh oil.
This step is exciting because your maintenance work is almost complete.
Locate the Oil Fill Cap
Open the hood.
Find the oil fill cap.
It usually has an oil can symbol.
Remove it carefully.
Insert a Funnel
Place a clean funnel into the oil fill opening.
The funnel helps prevent spills.
Clean spills immediately if they happen.
Pour the Correct Amount of Oil
Slowly pour fresh oil into the engine.
Do not rush.
Adding oil too quickly may cause overflow.
Always use the oil capacity listed in your owner’s manual.
Example capacities:
| Vehicle Type | Typical Oil Capacity |
| Small Car | 4–5 Quarts |
| Sedan | 5–6 Quarts |
| SUV | 5–7 Quarts |
| Pickup Truck | 6–8 Quarts |
Remember that every vehicle is different.
Replace the Oil Fill Cap
After filling the engine, reinstall the oil cap.
Turn it until it feels snug.
Double-check that it is secure.
How to Change Oil by Checking the Oil Level
Checking the oil level is very important.
Even experienced mechanics never skip this step.
Wait a Few Minutes
Allow the new oil to settle.
Wait about five minutes.
This gives an accurate reading.
Use the Dipstick
Pull out the dipstick.
Wipe it clean.
Insert it fully.
Pull it out again.
Look at the oil level.
It should fall between the “MIN” and “MAX” marks.
If it is low, add a little more oil.
If it is too high, remove the excess oil.
Start the Engine
Start the engine.
Let it idle for one or two minutes.
Meanwhile, watch for warning lights.
If the oil pressure light stays on, turn off the engine immediately.
Check for Leaks
While the engine runs, inspect:
- Oil filter
- Drain plug
- Oil pan
Look carefully for dripping oil.
Even one small leak should be fixed immediately.
Recheck the Oil Level
Turn off the engine.
Wait another five minutes.
Now check the dipstick one final time.
Add oil if necessary.
How to Change Oil Without Making Common Mistakes
Everyone makes mistakes while learning.
Fortunately, you can avoid the most common ones.
Mistake 1: Using the Wrong Oil
Always use the oil recommended by your vehicle manufacturer.
The wrong viscosity can reduce engine protection.
Mistake 2: Forgetting the Oil Filter
Some beginners only replace the oil.
However, the old filter still contains dirty oil.
Always replace both.
Mistake 3: Overtightening the Drain Plug
More force does not create a better seal.
Instead, overtightening may damage the oil pan.
Mistake 4: Overfilling the Engine
Too much oil creates pressure.
As a result, seals may leak.
Measure carefully.
Mistake 5: Forgetting the Oil Cap
Believe it or not, this happens often.
Without the oil cap, oil can splash throughout the engine bay.
Mistake 6: Ignoring Small Leaks
A tiny drip today may become a major repair later.
Fix leaks immediately.
How to Change Oil in Cold Weather
Winter changes the process slightly.
Fortunately, the job remains easy.
Before changing oil:
- Warm the engine for five minutes.
- Use the recommended winter oil viscosity.
- Keep oil containers indoors if possible.
- Wear gloves for warmth.
Cold oil drains more slowly.
Therefore, allow extra draining time.
How to Change Oil in Hot Weather
Summer heat also requires attention.
Avoid working under direct sunlight.
Instead:
- Choose morning hours.
- Allow the engine to cool.
- Stay hydrated.
- Wear eye protection.
Hot oil can cause burns.
Always work carefully.
Real-Life Example
David owns a ten-year-old sedan.
Every oil change at a repair shop cost him nearly $80.
He watched a beginner tutorial, bought the correct tools, and changed his own oil.
His first oil change took about one hour.
After several attempts, he finished each oil change in less than thirty minutes.
Today, David saves hundreds of dollars every year while keeping his engine in excellent condition.
Case Study – Saving Money with DIY Oil Changes
Vehicle: Family SUV
Professional Oil Change Cost: $95
DIY Cost:
- Full synthetic oil: $38
- Oil filter: $10
- Crush washer: $2
Total DIY Cost: $50
Savings Per Oil Change: $45
If the owner changes oil four times each year:
Annual savings:
$180
After five years:
More than $900 saved
In addition, the owner gains valuable maintenance skills.
Advantages of Learning How to Change Oil
Learning this skill offers many benefits.
Advantages
- Saves money
- Builds confidence
- Extends engine life
- Improves fuel economy
- Helps detect leaks early
- Lets you choose premium oil
- Reduces repair costs
- Takes less than one hour
- Requires only basic tools
- Helps you understand your vehicle better
Disadvantages of DIY Oil Changes
Although DIY oil changes offer many benefits, they also have a few drawbacks.
Disadvantages
- Requires safe lifting equipment
- Can become messy
- Takes time for beginners
- Used oil must be recycled properly
- Mistakes can damage the engine
- Limited workspace may make the job harder
Fortunately, careful preparation solves most of these problems.
Expert Advice
Professional mechanics recommend following a few simple habits.
- Always use quality oil.
- Replace the filter every time.
- Record each oil change.
- Check the oil level once a month.
- Never ignore warning lights.
- Inspect underneath your vehicle for leaks.
- Read your owner’s manual before beginning.
- Recycle used oil responsibly.
Experts also recommend buying quality filters instead of the cheapest option.
A good filter protects your engine much better.
Oil Change Maintenance Record Chart
Keeping records helps you remember the next service date.
| Date | Mileage | Oil Type | Filter Replaced | Next Oil Change |
| January | 45,000 | Full Synthetic | Yes | 52,500 |
| April | 52,500 | Full Synthetic | Yes | 60,000 |
| August | 60,000 | Full Synthetic | Yes | 67,500 |
| December | 67,500 | Full Synthetic | Yes | 75,000 |
Maintaining a simple chart like this also increases your vehicle’s resale value because buyers appreciate documented maintenance.
How to Change Oil and Recycle Used Oil Properly
After you finish an oil change, you should never pour used oil onto the ground or into a drain.
Used motor oil can pollute rivers, lakes, and soil. Even a small amount can harm wildlife and contaminate drinking water.
Instead, follow these simple steps:
- Pour the used oil into a clean, sealed container.
- Place the old oil filter in a leak-proof bag.
- Take both items to a local recycling center or an auto parts store that accepts used oil.
- Keep the container upright during transport.
Many auto parts stores and recycling facilities accept used oil for free.
Proper recycling helps protect the environment and keeps harmful chemicals out of nature.
How to Change Oil Without Making a Mess
Oil changes can become messy if you rush. Fortunately, a little preparation keeps your workspace clean.
Here are some simple tips:
- Place cardboard under the vehicle.
- Use a drain pan with a large opening.
- Keep paper towels nearby.
- Wipe spills immediately.
- Use a funnel when adding new oil.
- Wear disposable gloves.
Taking these small steps makes cleanup much easier.
How to Change Oil Faster Every Time
Your first oil change may take about an hour.
However, after a few attempts, you can finish much faster.
To save time:
- Gather all tools before starting.
- Buy the correct oil ahead of time.
- Use an oil filter wrench.
- Keep replacement washers ready.
- Store your maintenance supplies together.
Preparation makes every oil change smoother.
How to Change Oil for High-Mileage Vehicles
Older vehicles need extra attention.
If your car has more than 75,000 miles (120,000 km), consider using high-mileage engine oil.
These oils contain special additives that help:
- Reduce leaks
- Protect seals
- Lower engine wear
- Reduce oil consumption
- Improve lubrication
Always check your owner’s manual before switching oil types.
How to Change Oil for New Vehicles
Modern vehicles often use full synthetic oil.
Many also include oil life monitoring systems.
These systems calculate oil life based on:
- Driving habits
- Engine temperature
- Trip length
- Engine load
Even so, always check your oil level regularly.
Technology helps, but regular inspections remain important.
How to Change Oil Before a Long Road Trip
Planning a vacation?
A fresh oil change can help your engine perform better during long drives.
Before leaving:
- Check the oil level.
- Inspect the oil filter.
- Look for leaks.
- Verify tire pressure.
- Check coolant.
- Test the battery.
These simple checks reduce the chance of breakdowns.
How to Change Oil After Driving in Severe Conditions
Some driving conditions wear out engine oil faster.
Examples include:
- Heavy traffic
- Frequent short trips
- Towing trailers
- Mountain driving
- Dusty roads
- Very hot weather
- Very cold weather
If you drive under these conditions often, change your oil more frequently.
How to Change Oil and Protect Your Engine Year-Round
Your engine faces different challenges throughout the year.
Spring
- Check oil after winter.
- Inspect for leaks.
Summer
- Watch engine temperatures.
- Check oil before vacations.
Autumn
- Prepare for colder weather.
- Inspect all fluids.
Winter
- Use the recommended winter viscosity.
- Warm the engine gently.
- Check oil more often.
Seasonal care keeps your engine healthy.
How to Change Oil and Understand Your Dashboard
Modern vehicles have several warning lights.
Knowing their meaning helps prevent expensive repairs.
Oil Pressure Light
Stop driving if this light stays on.
Low oil pressure can damage the engine quickly.
Check Engine Light
Many issues can trigger this light.
Although it does not always mean an oil problem, inspect your vehicle soon.
Maintenance Reminder
Many newer cars display an oil change reminder.
Reset it only after completing the oil change.
How to Change Oil and Inspect Other Engine Parts
While changing your oil, take a few extra minutes to inspect your engine.
Look for:
- Loose hoses
- Cracked belts
- Coolant leaks
- Battery corrosion
- Worn wiring
- Damaged clamps
Finding small problems early often prevents costly repairs.
How to Change Oil and Check Fluid Levels
Engine oil is only one important fluid.
You should also inspect:
| Fluid | Why It Matters |
| Coolant | Prevents overheating |
| Brake Fluid | Helps braking performance |
| Power Steering Fluid | Improves steering |
| Transmission Fluid | Protects transmission |
| Windshield Washer Fluid | Improves visibility |
Checking all fluids together saves time.
How to Change Oil and Extend Engine Life
One simple oil change can make a big difference.
In addition, these habits help your engine last longer:
- Drive smoothly.
- Avoid sudden acceleration.
- Let the engine warm naturally.
- Replace air filters.
- Check tire pressure.
- Follow maintenance schedules.
- Listen for unusual noises.
Good habits protect your investment.
Common Myths About How to Change Oil
Many myths still confuse drivers.
Let’s separate fact from fiction.
Myth 1: Oil Must Be Changed Every 3,000 Miles
Not always.
Many modern vehicles safely go 7,500 to 10,000 miles with synthetic oil.
Myth 2: Dark Oil Means It Is Bad
Engine oil naturally becomes darker over time.
Dark color alone does not always mean replacement is needed.
Myth 3: Premium Oil Fixes Engine Problems
Oil protects engines.
However, it cannot repair damaged engine parts.
Myth 4: More Oil Is Better
Too much oil can actually damage your engine.
Always use the correct amount.
Myth 5: DIY Oil Changes Void the Warranty
In many countries, including the United States, performing your own maintenance does not automatically void a vehicle warranty, provided you follow the manufacturer’s maintenance requirements and keep records.
Always save receipts and document each oil change.
Troubleshooting Problems After How to Change Oil
Sometimes small issues appear after an oil change.
Fortunately, most are easy to fix.
Oil Leaking Under the Car
Possible causes:
- Loose drain plug
- Damaged washer
- Loose oil filter
Inspect each carefully.
Oil Pressure Warning Light
Possible reasons:
- Low oil level
- Wrong oil viscosity
- Loose filter
- Internal engine issue
Stop the engine immediately if the warning light remains on.
Burning Oil Smell
Check for spilled oil on the engine.
Clean any spills thoroughly.
Engine Noise
Verify the oil level.
Low oil can cause engine knocking.
Never ignore unusual sounds.
Best Habits After You How to Change Oil
After finishing the job:
- Record the date.
- Record the mileage.
- Save your receipt.
- Inspect for leaks after driving.
- Recheck the oil level the next day.
These habits help keep accurate maintenance records.
Beginner’s Maintenance Checklist
Use this checklist every time.
✅ Park safely
✅ Warm engine slightly
✅ Gather tools
✅ Wear gloves
✅ Lift vehicle safely
✅ Remove drain plug
✅ Drain old oil completely
✅ Replace drain washer
✅ Install drain plug
✅ Replace oil filter
✅ Add fresh oil
✅ Check dipstick
✅ Start engine
✅ Inspect for leaks
✅ Recheck oil level
✅ Record mileage
✅ Recycle used oil
Following this checklist reduces mistakes.
Expert Maintenance Tips for Long-Term Reliability
Experienced mechanics recommend building good maintenance habits instead of waiting for problems.
Here are a few additional tips:
- Check your oil level once every month.
- Listen for new engine noises.
- Replace the air filter on schedule.
- Inspect hoses during every oil change.
- Keep your engine clean.
- Read your owner’s manual regularly.
- Never delay scheduled maintenance.
Small actions today can prevent expensive repairs tomorrow.
By now, you have learned almost everything you need to know about how to change oil safely and correctly. From choosing the right oil to replacing the filter, checking for leaks, recycling used oil, and following a maintenance schedule, each step helps protect your engine and improve your vehicle’s performance.
How to Change Oil Yourself: Easy DIY Maintenance Guide
Frequently Asked Questions About How to Change Oil
- How do I know when my car needs an oil change?
Most vehicles need an oil change every 5,000–10,000 miles when using synthetic oil. However, always check your owner’s manual because every vehicle is different. Also, pay attention to dashboard reminders, unusual engine noise, or dirty oil.
- Can I learn how to change oil even if I have never worked on a car?
Yes. An oil change is one of the easiest maintenance jobs for beginners. As long as you follow the steps carefully and use the correct tools, most people can complete it successfully.
- How long does an oil change take?
Your first oil change may take about one hour. After gaining experience, many people finish in 30 to 45 minutes.
- What happens if I forget to change my engine oil?
Old oil loses its ability to protect the engine. As a result, friction increases, parts wear faster, fuel economy drops, and serious engine damage may occur.
- Can I use any engine oil?
No. Always use the oil type and viscosity recommended in your owner’s manual. Using the wrong oil can reduce engine performance and protection.
- Should I replace the oil filter every time?
Yes. Replacing the oil filter during every oil change helps keep the new oil clean and protects your engine.
- Is synthetic oil better than conventional oil?
For many modern vehicles, synthetic oil offers better protection, performs well in extreme temperatures, and usually lasts longer. However, always follow your manufacturer’s recommendation.
- What tools do I need to change oil?
Basic tools include:
- Engine oil
- Oil filter
- Drain pan
- Funnel
- Socket wrench
- Oil filter wrench
- Gloves
- Safety glasses
- Jack and jack stands (if needed)
- Can I change my oil without lifting the vehicle?
Some vehicles have enough ground clearance. Others require lifting. If you need to raise your vehicle, always use approved jack stands for safety.
- What should I do with used engine oil?
Never pour used oil into drains or onto the ground. Instead, take it to a recycling center or an auto parts store that accepts used motor oil.
- What happens if I overfill the engine with oil?
Too much oil can increase pressure inside the engine. This may cause leaks, foaming, reduced lubrication, and possible engine damage. Always check the dipstick after filling.
- Why is my new oil already dark?
Fresh oil may darken quickly because it cleans contaminants from inside the engine. Dark color alone does not always mean the oil needs replacing.
- Can I mix different engine oils?
In an emergency, mixing compatible oils may help protect the engine until you can perform a proper oil change. However, for routine maintenance, use the recommended oil consistently.
- Why does my engine make noise after an oil change?
Possible causes include:
- Low oil level
- Wrong oil viscosity
- Loose oil filter
- Loose drain plug
Stop driving and inspect the vehicle if unusual noises continue.
- Should I warm the engine before changing oil?
Yes. A slightly warm engine allows oil to drain more easily. However, let it cool enough to avoid burns before beginning the work.
- How can I avoid oil leaks after changing oil?
Make sure you:
- Tighten the drain plug correctly.
- Install a new crush washer if required.
- Lubricate the new oil filter gasket.
- Hand-tighten the oil filter according to the manufacturer’s instructions.
- Check for leaks after starting the engine.
- Does changing my own oil void my warranty?
In many regions, including the United States, changing your own oil does not automatically void your warranty if you use the correct parts and fluids and keep maintenance records. Check the warranty terms that apply where you live.
- How much money can I save by changing my own oil?
Savings vary by vehicle and oil type. Many drivers save $30 to $70 per oil change. Over several years, DIY maintenance can save hundreds of dollars.
- What is the biggest mistake beginners make?
Common mistakes include:
- Using the wrong oil
- Forgetting the oil filter
- Overtightening the drain plug
- Overfilling the engine
- Forgetting to reinstall the oil cap
- Not checking for leaks afterward
Taking your time helps prevent these problems.
- Is learning how to change oil worth it?
Yes. Learning how to change oil helps you save money, understand your vehicle better, improve engine life, and build confidence with basic car maintenance.
Quick Oil Change Checklist
Before you finish, use this checklist every time you change your oil.
| Task | Complete |
| Read the owner’s manual | ✅ |
| Buy the correct oil | ✅ |
| Buy the correct oil filter | ✅ |
| Gather all tools | ✅ |
| Park on level ground | ✅ |
| Warm the engine slightly | ✅ |
| Raise the vehicle safely if needed | ✅ |
| Drain the old oil completely | ✅ |
| Replace the oil filter | ✅ |
| Install the drain plug correctly | ✅ |
| Add the recommended amount of oil | ✅ |
| Check the dipstick | ✅ |
| Start the engine | ✅ |
| Check carefully for leaks | ✅ |
| Recheck the oil level | ✅ |
| Record the mileage and date | ✅ |
| Recycle used oil responsibly | ✅ |
Final Expert Advice
Professional mechanics agree that regular oil changes are one of the most valuable maintenance tasks for any vehicle. While modern engines are built to last, they still depend on clean engine oil for lubrication, cooling, and protection.
To get the best results:
- Follow the oil change interval recommended by your vehicle manufacturer.
- Use high-quality oil and filters that meet the required specifications.
- Check your oil level at least once a month.
- Investigate warning lights or unusual engine noises promptly.
- Keep a written or digital maintenance record.
- Recycle used oil and filters through approved collection centers.
- Combine oil changes with routine inspections of belts, hoses, tires, brakes, and other fluids.
Good maintenance habits today can reduce repair costs and help your vehicle remain reliable for many years.
Conclusion
Learning how to change oil is one of the most useful skills any vehicle owner can develop. Although it may seem difficult at first, the process becomes simple once you understand each step. With the correct tools, the right engine oil, and careful attention to safety, you can complete an oil change at home while saving money and protecting your engine.
Regular oil changes reduce engine wear, improve fuel efficiency, support reliable performance, and may extend the life of your vehicle. In addition, performing this maintenance yourself gives you a better understanding of your car and helps you spot small problems before they become expensive repairs.
Whether you drive every day or only occasionally, following your manufacturer’s maintenance schedule is the best way to keep your vehicle running smoothly. Combine regular oil changes with routine inspections, responsible recycling, and accurate maintenance records, and your engine will have the best chance of delivering dependable performance for years to come.
Recommended External Resources
For additional guidance and maintenance information, visit these trusted sources:
- AAA Car Care: https://www.aaa.com/
- Consumer Reports – Car Maintenance: https://www.consumerreports.org/cars/
- U.S. Environmental Protection Agency (Used Oil Recycling): https://www.epa.gov/
- National Highway Traffic Safety Administration (Vehicle Safety): https://www.nhtsa.gov/
These resources provide reliable information on vehicle maintenance, safety, and environmentally responsible disposal of used motor oil.


